Safe and Effective Wet Scraping for Popcorn Ceilings
Safe and Effective Wet Scraping for Popcorn Ceilings
Understanding Popcorn Ceilings and Safety Concerns
Popcorn ceilings, also known as stipple or acoustic ceilings, were popular in homes from the 1950s to the 1980s. They have a bumpy texture that helps hide imperfections and improve soundproofing. While they were once trendy, many homeowners now prefer a smoother look. But before you start removing a popcorn ceiling, it’s important to know what you’re dealing with.
One major concern with older popcorn ceilings is the potential presence of asbestos. Asbestos was commonly used because it was strong and fire-resistant. Unfortunately, it can be a health hazard if disturbed, as inhaling asbestos fibers can lead to serious lung diseases. This means safety is a top priority when dealing with older popcorn ceilings.
Before you begin any removal process, it’s crucial to test your ceiling for asbestos. You can do this by purchasing an asbestos test kit or hiring an expert who knows how to handle asbestos safely. If your ceiling contains asbestos, it’s best to hire a professional to handle the removal. This ensures that the job is done safely and according to regulations, protecting your health and that of your family. Always remember, safety first!
Preparing for Wet Scraping: Tools and Materials
Before you start wet scraping your popcorn ceiling, you need to gather the right tools and materials. Having everything ready will make the process smoother and safer. Let’s make sure you’re fully prepared for the task ahead.
Tools and Materials:
- Scraper: Use a putty knife or a ceiling scraper designed for this job.
- Spray Bottle or Garden Sprayer: Essential for wetting the ceiling before scraping.
- Drywall Compound: Used to smooth out any rough spots after scraping.
Room Preparation:
- Cover floors and furniture with plastic sheets or drop cloths to keep them clean.
- Remove or cover any light fixtures to prevent damage.
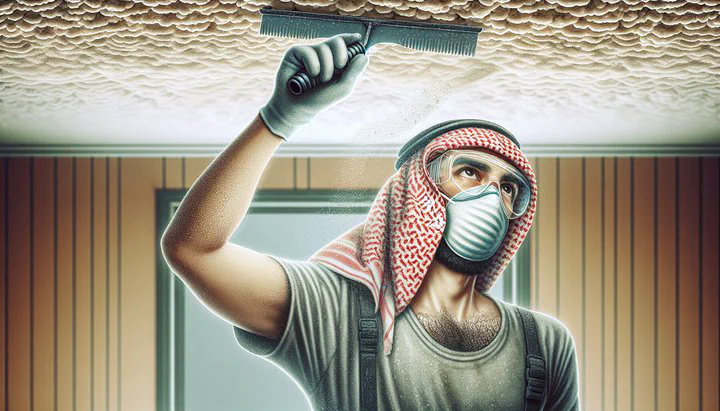
Safety Gear:
- Mask or Respirator: Protects your lungs from dust and debris.
- Goggles: Keep particles out of your eyes.
- Gloves: Protect your hands.
- Wear old clothes that you don’t mind getting dirty.
Once you have your tools, materials, and safety gear ready, you’re set to start wet scraping. By preparing properly, you’ll ensure a smooth workflow and minimize any mess, making it easier to safely wet scrape some painted, some unpainted popcorn ceiling. Always remember, the goal is to make this project as safe and efficient as possible!
Wet Scraping Technique for Painted and Unpainted Ceilings
You’re now ready to start the wet scraping technique. This method works well for both painted and unpainted popcorn ceilings. Let’s make sure you get a smooth ceiling finish without any damage.
-
Wetting the Ceiling
Fill a spray bottle with water. Wetting the ceiling makes it easier to scrape off the popcorn texture. For painted ceilings, add a drop of dish soap to help the water soak in. Spray a small section of the ceiling and wait about 15 minutes. This will soften the texture. If your ceiling isn’t painted, plain water is fine. -
Scraping the Surface
Use a wide scraper to gently remove the popcorn texture. Start at the corner of the wetted section and carefully work across. If the ceiling is painted, you might need to press a bit harder, but be gentle to avoid damaging the ceiling. -
Handling Stubborn Areas
If some areas are tough, spray them again and wait a bit. Take your time. The drywall guy was with wetting things appropriately, so even stubborn spots came off without damage. -
Achieving a Smooth Finish
Check for rough spots after scraping. He covered what remained in drywall compound to smooth things out. Apply a thin layer and sand it gently when dry.
By following these steps, you can safely wet scrape some painted, some unpainted popcorn ceiling. With careful attention and patience, your ceiling will be smooth and ready for painting or a new texture in no time!
Dealing with Residue and Finishing Touches
Once you’ve successfully scraped off the popcorn texture, you’ll likely find some leftover residue that needs attention. Tackling this step properly will ensure your ceiling looks smooth and clean, ready for whatever comes next.
Handling Leftover Residue
After wet scraping, inspect the ceiling for any bits of texture that didn’t come off. These can create an uneven surface if left unaddressed. Use a damp cloth or sponge to wipe down the ceiling, removing any remaining bits. For more stubborn areas, you might need to re-spray with water and gently scrape again. This extra bit of effort will help ensure a smooth finish.
Smoothing the Surface
Next, it’s time to make sure the ceiling is perfectly smooth. He covered what remained in drywall compound, which is a simple and effective way to even out any uneven spots. Apply a thin layer of drywall compound over the entire ceiling. Use a wide putty knife or trowel to spread it evenly, covering any imperfections left from the scraping process. Allow it to dry completely before proceeding to the next step.
Sanding for Perfection
Once the drywall compound is dry, gently sand the ceiling to achieve a uniform surface. Use fine-grit sandpaper to avoid scratching or damaging the surface. The goal is to create a smooth canvas for painting or any other finish you plan to apply. Take your time with this step to ensure a flawless result.
Thorough Cleanup
After sanding, it’s crucial to clean up thoroughly. Popcorn ceiling removal can be messy, leaving behind a fair amount of dust and debris. Vacuumed every nook and cranny I could find to ensure no dust remains. This step is vital not only for cleanliness but also for ensuring that you have a dust-free surface for painting or finishing.
By following these steps, you’ll not only remove the popcorn ceiling but also ensure a pristine finish. Dealing with residue and applying those finishing touches properly will make all the difference in the final appearance of your ceiling. Remember, meticulous cleanup and attention to detail at this stage will make the next steps in your ceiling project much smoother and more satisfying.
Tips for a Clean and Safe Workspace
Ensuring a clean and safe workspace is key to a successful popcorn ceiling removal project. By following some simple tips, you can keep your area tidy and protect yourself throughout the process.
Personal Safety First
Always prioritize your safety when working on home projects. Wear a protective mask or respirator to keep dust and small particles out of your lungs. Goggles are a must to protect your eyes from debris, and gloves will keep your hands safe while you scrape and handle tools. Dress in old clothes that you don’t mind getting dirty, as the process can be quite messy.
Dust Control Measures
Controlling dust is crucial to maintaining a clean workspace. Keep the area well-ventilated by opening windows or using fans to help disperse dust. Consider hanging plastic sheeting over doorways to contain dust within the workspace. This will also prevent it from spreading to other parts of the house. Regularly vacuum as you work to keep dust from accumulating. Remember, I vacuumed every nook and cranny I could find, which made a big difference in maintaining a tidy environment.
Proper Disposal of Debris
After removing the popcorn ceiling, you’ll have a fair amount of debris to dispose of. Collect the scraped material in heavy-duty garbage bags and seal them tightly. Check with your local waste management for guidelines on disposing of this type of debris. Proper disposal is important not only for cleanliness but also for environmental safety.
Maintaining Organization
Keep your tools and materials organized throughout the project. Use a tool belt or a small bucket to hold scrapers, spray bottles, and other essentials. This keeps everything you need within easy reach and prevents unnecessary clutter. A tidy workspace helps you focus on the task and work more efficiently.
By following these tips, you can create a clean and safe environment for wet scraping popcorn ceilings. Not only will this help you work more effectively, but it will also ensure that your home remains as dust-free as possible throughout the project. Remember, a little bit of preparation and ongoing maintenance goes a long way in completing your project successfully and safely.
Related
- How to Stain Pavers to Match Your Siding
- How to Reupholster Down Pillows- A Guide to Using Upholstery Shops and DIY Tips
- How to Replace Recessed Light Trim- A Step-by-Step Guide
- Restoring Furniture with Nicks and Scratches- A DIY Guide
- How to Paint Your Chain Link Fence Black and Enhance Your Home's Curb Appeal